Showing posts with label Appetizer. Show all posts

Tuesday, January 12, 2016

The Possibilities for Zucchini and Rice Crostata


As I begin my third year of food blogging, I have to share that this journey continues to excite me.  I am still learning about how to use this blog and hope to make navigating easier for you this year.  Perhaps a recipe link on the menu bar (since I haven't populated that yet)?  Maybe only small snapshots of each post so as one scrolls down the option to read more is there if necessary?  The seriousness of nutrition has me thinking too...a lot.  So I am hoping to explore more savory, healthy dishes this year because it's time.  Have you seen the size of my Dessert label? Anyway, thanks for your visits to this blog, and I hope that my sharing provides some spark to your food thoughts.

This is an ideal recipe, one that stands out as an hors d' oeuvre, adds pizzazz as a side, or comes center stage as the entrée.  This crostata, or tart, can be adorned with an olive oil crust or not, your choice.  The filling as a stand alone is that good.  Its creamy cheesiness? A salute to ricotta and parmesan cheeses.  Beauty? Hats off to the whopping green onion invasion and flecks of grated zucchini consistent across an egg custard.  The crust?  An olive oil wonder that almost rolls itself out.  Really!

Let's not forget the rice and the unique way that it is cooked into this crostata.  For those of you who feel that cooking rice is a puzzle you cannot solve, move to the head of the class.  You will ace its special handling prior to its baking in this dish.

Notes:

1)  I made this dish twice in December and both times the eye appeal and taste were success stories.  The recipe is from Lidia Bastianich's food blog.  You may know of her:  a proud Italian woman who shares her heritage through food on network TV, in cookbooks, and at her NYC restaurants.  The first baking was for the taste of the filling only, because even a fabulous crust cannot carry a disappointing filling, right?  I also cut the ingredients in half.  Why make so much if the filling was going to disappoint, right?  Guess what?  The filling passed!

2)  Most of the photos in this post are of the half-recipe filling sans crust.

3)  I used the full recipe as a vegetarian entrée for Christmas dinner, and the following day as a brunch side dish.  I am going to call that move a stroke of genius.

4)  I used an 8 x 8 inch square pan the first time I made half the recipe.  But when I made the entire recipe, I used a 13 x 9 inch pan.  Still, this was not the size baking sheet that Lidia recommended (a 12 x 18 inch rimmed baking sheet).  No problem, the filling was thicker, the baking was longer (as you would expect), but the results were just as lovely.

5)  Don't skimp on the scallions.  They add beautiful color to the tart.

6)  Though Lidia recommends placing the tart pan on a pizza stone to bake, I did not.


Rice and Zucchini Crostata
from Lidiasitaly.com

For the dough
2 cups all-purpose flour (more for working)
1 teaspoon kosher salt
1/2 cup extra-virgin olive oil
1/3 cup cold water (more if needed)

For the filling
1 pound zucchini
1/2 cup short-grained rice (I used arborio)
2 cups ricotta (I used part-skim and did not drain)
1 cup grated parmigiano-reggiano cheese
2 bunches of scallions or more, finely chopped (2 cups worth)
3 large eggs
2 cups milk (I used 2%)
2 teaspoons kosher salt
Butter or cooking spray for the baking pan

Directions

1.  Grease your baking pan and preheat the oven to 375ºF.

2.  To make the dough, place the all-purpose flour and salt into your food processor.  Add the olive oil and water as well.  Process for about 30 seconds or until a soft dough forms around the blade.  Add a bit more water if this doesn't happen.  The dough should be smooth and soft.

3.  Take the dough out of the processor and knead by hand on a flat surface until it is smooth and soft, adding a bit of flour to your surface if the dough is too sticky.  Form the dough into a rectangle, wrap in plastic wrap to rest at room temperature.  Alternately, dough can be refrigerated for up to a day.  Return to room temperature before rolling.

4.  To make the filling, shred the zucchini on the coarse holes of a box grater into a large bowl.  Place the rice into this same bowl and toss the rice and shredded zucchini together.  Let sit for at least 30 minutes (mine sat for over an hour) so that the rice absorbs the zucchini liquid.


5.  Then fold the ricotta into the rice and zucchini mixture, followed by the grated cheese, scallions, beaten eggs, milk, salt.  Stir until thoroughly mixed.  The picture below is from the half recipe, which explains the 2 eggs.  Do the math:  3/2 = 2! (Close enough!)


6.  At this point, you can bake the filling in an 8 x 8 inch prepared pan (as I initially did when I cut the ingredients in half) or a 13 x 9 inch prepared pan if you've made the full amount.  Either way, it's a great meatless breakfast, lunch, or dinner, needing only some roasted veggies on the side.


7.  To put the whole recipe together, roll the dough to a rectangle that's 4 inches longer than either the length or width of the baking pan.  Transfer the dough into the baking pan by rolling it up around the rolling pin (and then unrolling) or folding it in quarters and lifting it into the pan (and then unfolding).  When centered, press the dough gently to flatten it across the bottom, leaving the flaps overhanging the sides.  If the dough needs repair from a tear, pinch a small piece of dough from the edges and patch by pressing this piece onto the torn area.

8.  Scrape the filling into the dough-lined pan and spread with the spatula so that it evenly fills the crust.  Fold the dough flaps over the filling, pleating around the corners.  Lidia says it will look like a picture frame of dough with the filling in the center.

9.  In addition to my baking pan being smaller than Lidia's suggested size, it also had higher sides than a baking sheet, so my crust just stood rather than folded.  This was not a problem.

10. I also added a few coarsely-chopped peppadews for some added color.


11. Bake for an hour, give or take, until an inserted toothpick comes out clean.  If it browns too quickly, cover lightly with foil.

12. The result is a moist, creamy, and tasteful filling (with or without a crispy crust).  Give it a try and let me know what you think :)

Tuesday, August 18, 2015

Faux Gras (aka Unbelievable Lentil Mushroom Pâté)


Sometimes the food I prepare appeals to all five senses (yes, some more than others), and sometimes I rely on the accoutrements to dress up the sight of a...well... very bland-looking food item.  A good example of this is last month's blog on Beer Cheese.  You would never look at a dish of beer cheese and respond with, "Wow!  That looks incredible!"  But you might, after tasting it on pretzel, smile and say, "That tasted like a whole lot more!"

Today's blog supports this theme of yummy, but not so easy-on-the-eyes (if you get my drift).  This Faux Gras tastes much like its controversial cousin (it's true!) and yet like Foie Gras, it is not so much to look at.

Foie Gras is the food made from the liver of a duck or goose.   It is considered a delicacy, often eaten as a pâte, but global awareness of the process to produce this fatty liver has caused some controversy in recent years (see this timeline from the Wall Street Journal).  I don't believe that I have ever had Foie Gras, but I know that many people like it...Let's leave it at that.  This Faux Gras is a vegetarian alternative and a great rival to its meaty counterpart (according to some people I know).

I have been following David Lebovitz's food blog for close to ten years, and have made many of his recipes with great results.  This spread was featured recently, and because it was meatless and could even be vegan, I decided to give it a try.  Happy times!

Notes

1.  I followed David's ingredients fairly accurately, but I might have used a few more mushrooms, or a medium onion, or two large garlic cloves, etc.  You understand...

2.  I used coconut oil in place of the olive oil, but here's where you can go vegan:  Exchange the butter for olive oil/coconut oil.

3.  I used regular dry lentils...nothing fancy...Goya brand.  I followed the package directions and started with one cup of dry lentils since they double in volume after cooking.

4.  I toasted pecans in a foiled-lined cast iron pan on the gas stovetop.  It took only minutes and it was easy cleanup.

5.  I didn't have soy sauce or tamari, so I left this ingredient out.

6.  Please use fresh herbs.  They are key players in the balancing of flavors.

7.  For the life of me, I could not find any cognac or brandy (I so mean it); I used St. Germain Elderflower Liquor.  Not bad :)


Faux Gras
Yield:  3 Six-ounce ramekins

About 12 medium button mushrooms to make about 1 cup (or 100 g)
2 T. olive oil (or coconut oil)
2 T. butter (or olive oil/coconut oil)
1 small onion, diced
2 cloves garlic, peeled and minced
2 cups of cooked lentils
1 cup toasted walnuts or pecans, coarsely chopped
2 T. freshly squeezed lemon juice
1 T. soy sauce or tamarin
2 t. minced fresh rosemary
2 t. minced fresh thyme
2 T. fresh sage or flat leaf parsley, chopped (I used parsley)
1 t. brown sugar
1/8 t. cayenne pepper
Salt and freshly ground pepper to taste (I did not use any salt)

Directions

1.  Wipe off the mushrooms and slice the bottom of the stem a bit to get rid of any dryness.  Slice.

2.  Heat the olive oil/coconut oil/butter (your combination should equal 1/4 cup total) in a large skillet.  Add the onions and garlic and cook, stirring occasionally, until translucent, about 5-10 minutes.  Add mushroom slices and cook, stirring, until soft and cooked entirely, another 5-10 minutes.  Remove from heat.

3.  In a food processor, combine the cooked lentils, nuts, lemon juice, soy (if using), all herbs, Cognac (if using), brown sugar, and cayenne pepper.  Add in the mushroom mixture and process until smooth.  Taste and add salt, pepper, or additional Cognac, lemon juice, or soy to enhance flavor.  Process again.


4.  Scrape the pâté into small serving bowls or ramekins.  Cover with plastic wrap and refrigerate for a few hours.


5.  Serve with crackers, small toasts, marmalade, candied walnuts, carrots sticks, pickles, etc.

6.  Freeze well-wrapped leftovers for a few months.


Thursday, July 30, 2015

Beer Cheese


Oh my...this is a winner if for no other reason than it can be flavor-tweaked in so many ways to suit your tastebuds.  In addition, its uses are many:  as a dip, as the base layer for crostini, as the main/sole component for grilled cheese, as a spoonful of goodness that has just come from a dive into this cheesy, beer-y spread/dip and you take a lick.

I was drawn to this recipe because there are people in my life that enjoy beer, particularly dark beers.  Me?  I enjoy a sip of beer and discussing its qualities on the palate.  But mostly I prefer wine.  However, given the chance to use beer in an appetizer respects both beer drinkers and non beer-drinkers.  This idea I like!  Beer cheese invites those who love cheese (pretty much everyone I imagine) to experience beer in a different way. Depending on the type of beer and cheese used, this recipe offers a depth of taste with a...ahem...spririted flavor load.

Recently this beer cheese debuted outdoors during an evening concert at the Mann Music Center in Philadelphia.  My family was picnicking on the lawn admiring the Philly skyline while being serenaded by the Philadelphia Orchestra.  Their treat was an overture, a piano concerto, and the symphony everyone knows by its first four notes.  Remember it?  Da-da-da-da... That's right!  His 5th. The weather was perfect for dining al fresco, and with appetizers, sandwiches, salads, desserts, and drinks, we were very happy.

I had prepared the cheese the day before, chilling it in the refrigerator while the flavors did their mingling-thing.  At the picnic, the cheese was used as a dip.  The general consensus was that it was a little picante and a little addictive.  Not too shabby for its introduction...


Notes

1.  Next time around I think I will play a bit with the spicy-ness.  Dial back on the cayenne and hot sauce if you are serving it to folks that prefer milder.  Crank it up for those that want a good nose-blowing.

2.  I am also thinking about playing around with the cheese.  Maybe a few ounces of mozzarella?  Maybe leave out the cayenne altogether and add a few ounces of Pepper Jack?  A little goat?  A bit of horseradish?

3.  After processing all the ingredients, place the beer cheese in a container to chill.  Let it warm up a bit before using.  Otherwise, you may have to use a knife to spread (as opposed to just dipping in your crudités).  In other words, the longer it warms up, the softer it becomes.

4.  The recipe I used also highlighted making soft pretzels to dip into the beer cheese.  Yummy goodness...but that's for another day...

Beer Cheese
Yield:  a substantial two cups

6 ounces beer (I used Samuel Smith Oatmeal Stout)
2 cloves garlic
12 ounces sharp cheddar cheese, shredded
1 teaspoon cayenne
1 teaspoon hot sauce (I used Frank's)
1/2 teaspoon Worcestershire sauce
1 teaspoon Dijon mustard


Directions

1.  Measure out the beer and set aside to lose some of the carbonation.  Enjoy the remainder!
2.  Place the garlic cloves into a food processor and pulse until minced.
3.  Add in the shredded sharp cheese, cayenne, hot sauce, Worcestershire sauce, and mustard and process until creamy and smooth.


4.  Scrape down the sides of the processor with a spatula.  Then slowly add the beer.
5.  Process until well mixed.
6.  Transfer to a serving dish if using immediately or cover and refrigerate.


Friday, February 28, 2014

Eggplant Caponata


I know you're wondering if I made a mistake.

You're thinking, "Did she load the wrong pic for a recipe about sweet and sour eggplant?  Did she forget to edit?  She's making early blunders that will ultimately derail her brand new blog."

Heh…heh… I am completely in control.  Bear with me on this one.

I attended Justin Timberlake's Philly Concert on Tuesday, February 25, and I've got to tell you that it was spectacular in every way.  Of course, JT was the artist extraordinaire showcasing his many talents.  He was the singer, the dancer, pianist and guitarist, and he could do all of this amidst a video background, a light show, and thousands of screaming fans…for 2 1/2 hours!  Stay with me cause I don't wanna lose you now.

At midshow, the apron of the stage separated and slowly moved down and over the packed arena (see photo above) while JT and his entourage of singers and dancers kept their sexy on.  What a feat of engineering.

Earlier, our group of four had prepared for the event at my daughter's house.  We wore black tank tops, each painted with either a J, T, 20/, or 20.  If you're still hanging in with this story, then you probably know that the concert was part of his 20/20 Experience tour.


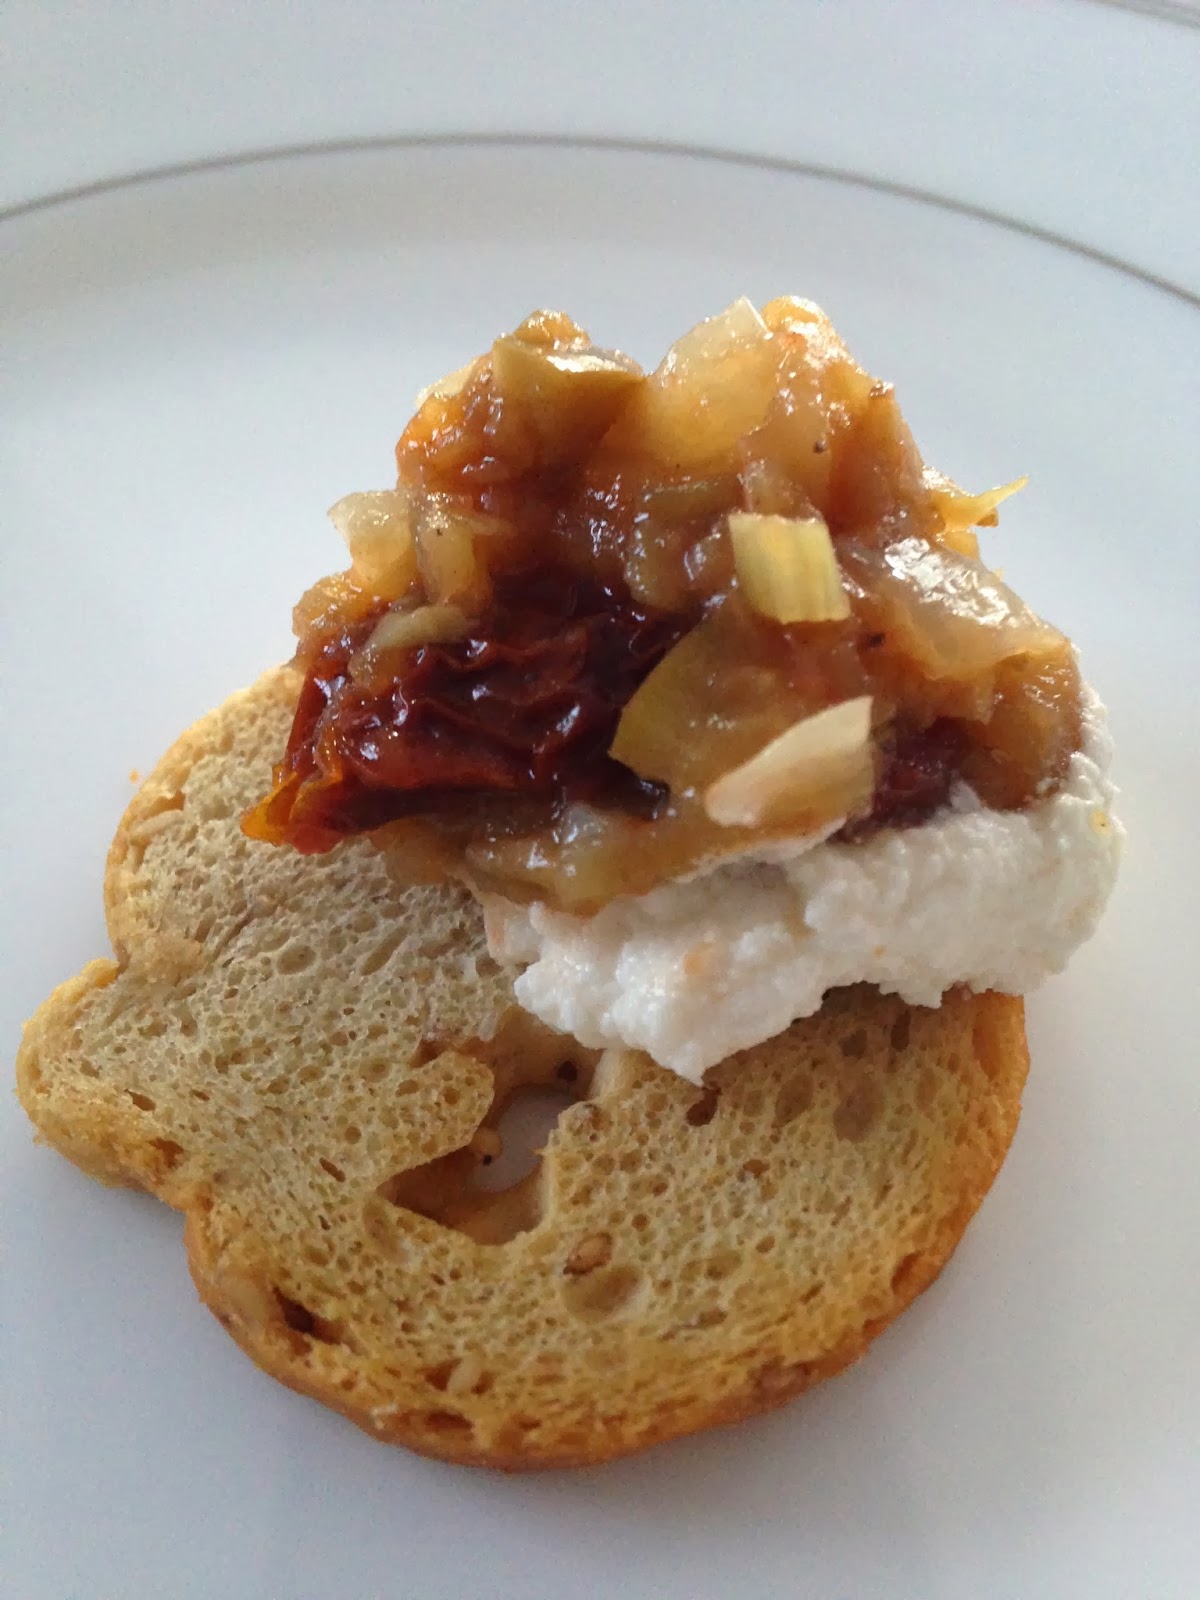
We planned to have snacks before heading to the Wells Fargo Center, and though we didn't try Jack or even Jim, we did enjoy Geyser Peak's Sauve Blanc with Eggplant Caponata.  Tah dah!  The connection at last.

This caponata was nestled in a ring of ricotta cheese and we used crunchy bagel chips to dip into the duo.  It was a TKO, and that's all I have to say.


Eggplant Caponata
adapted slightly from Brooklyn Salt's recipe
Yield:  As an appetizer, enough for 4-6 people

2 tablespoons olive oil
1 small yellow onion, chopped
1 and 1/2 celery stalks, chopped
Pinch of salt
1 medium eggplant, skinned and cubed
1/2 cup pitted green olives, chopped
1 tablespoon drained capers
1/2 teaspoon red pepper flakes
2-3 sun-dried tomatoes, in oil
2 and 1/2 whole peeled tomatoes, from a 14 oz. can of whole peeled tomatoes
1/8 cup red wine vinegar
1/2 tablespoon sugar

Directions

Note:  This recipe is made easily from one pot.  I used a non-stick Dutch oven, but any larger sauté pan with high sides will work.  You cook a portion of the ingredients together and then let them cool in your serving bowl while cooking the next portion, etc.  When finished, there is not much to clean up.


1.  Heat olive oil in a Dutch oven or sauté pan over medium/high heat.  Add the onion, celery, and a small pinch of salt.  Cook, stirring occasionally until the celery and onions are completely soft and somewhat caramelized.  Transfer to a bowl to cool.


2.  Return the Dutch oven to the stovetop.  Add the eggplant and sprinkle it with a pinch of salt.  Do not stir the eggplant until the bottom layer browns slightly.  Then stir everything up and let it brown again on the bottom layer.  Continue to do this until all of the cubes are browned and the volume has decreased by half or more.  Collapsing is good!  Transfer the eggplant to the same bowl with the onion and celery.


3.  Return the Dutch oven to the stovetop and add the olives, capers, red pepper flakes, and sun-dried tomatoes.  Sauté for a few minutes until the aromas are released.  Then add in the tomatoes, vinegar, and sugar.  Stir, breaking up the tomatoes.  Let simmer for a couple minutes.


4.  Transfer the olive mixture to the bowl with the onions, celery, and eggplant.


5.  Mix all the ingredients well and let cool.  Serve on toasted slices of baguette, on a bed of ricotta cheese, or as a dip with crackers.

Monday, February 3, 2014

Pimento Cheese Comfort


I don't know about you, but had I been asked twenty-four hours ago about the probability of snow for today, I would have responded, "Slim to none."  And do you know why I would have answered that way?  Because I was too busy thinking about food for the Super Bowl (Yep, I'm one of them).

But awaking to heavy snow this morning, a snowfall that has brought more than six inches so far, I realized that the reason I was protected from usual forecast sensationalizing was because the Super Bowl grabbed a humongous chunk of broadcast time this past week.  None of us knew what was coming (in more ways than one).

Maybe the Broncos weren't the winners last night, but this recipe was!  Yay!  It is soooo easy to make and has the ability to play many roles. Not only is the taste memorable, the combination of flavors from minimal ingredients unique, but it is…don't hate me... slightly addictive ;)

It's pimento cheese, a staple of the South.  Though there are many modifications, there is no denying its prominence as a flavor enhancer and prominent player in southern food culture. Question:  Why has it taken me so long to try this lovely blend of ingredients?

Chunky or smooth, made with few ingredients or a few more, pimento cheese is a versatile winner.  Last night, it was served as a dip for crackers and chips, but I can see it being used for making grilled cheese sandwiches, as a topping for burgers or hotdogs, or as a major player in creating crostini.  I've also read that a popular after school snack is pimento cheese spread between two pieces of bread.

Pimento Cheese Comfort
(adapted from David Leite's blog)

Yield: about 1 1/2 cups

8 ounces of sharp orange Cheddar cheese, grated
3/8 cups of mayonnaise
2 ounces of pimentos, drained and chopped
1 tablespoon grated sweet onion, like a Vidalia
Freshly ground pepper to taste


Directions

1.  I used a bag of shredded cheese.  (Use a grater if you need to create the shreds.)
2.  Place the shredded cheese into a bowl.
3.  Add the remaining ingredients and mix thoroughly.
4.  Cover and refrigerate for a few hours to meld the flavors.
5.  Serve at room temperature.